Windows Containers?
Windows Containers is a new way to package applications and guarantee they will run in a similar fashion on most environments. Containers also facilitate the creation of distributed systems and micro-services architectures. Windows Containers will allow to convert classic .NET Framework applications (e.g. ASP.NET sites) to be containerized and easily distributed.
Why do I want them in a Continuous Integration and Delivery pipeline?
A CI/CD pipeline provides one of the most modern way for developers to build an application that can be evaluated/tested/approved at different stages (e.g., development, testing, staging, and production). It helps make sure the code stay production ready through it until release. The stages in the pipeline can be all automated or stopped for approval to better manage the application release.
What we will be building in this post:
- Windows Container Builder – It will be used to compile an ASP.NET app.
- Windows ASP.NET Container App – Runs a demo site (return the host IP address)
- Visual Studio Team Service (VSTS) Pipeline
- Continuous Integration (CI) and Continuous Deliver (CD) for both containers.
- Environment Deployment

What you should know:
- Docker (or at least Dockerfile)
- Git (or at least cloning of a repository)
What you should have:
- Azure Subscription
- Kubernetes Windows ACS (how to here or here).
- VSTS Account and project created
- Git repository (e.g. GitHub)
- Docker for Windows (optional)
- Azure Container Registry (ACR)
- Kubernetes Clusters (AKS, ACS, or any other of your preference)
- KUBECONFIG and Server URL for your Kubernetes Cluster
First let’s get the code:
The code we are going to use for this exercise is located in GitHub (https://github.com/code4clouds/dockerfiles-windows). It is are forked from jsturtevant original Windows container recipe (Thanks James!).
Let’s get at it:
- Fork my GitHub account (or copy the code to your favorite public git repo)
- To clone the repo use the following command (I am using my repo for this how to):git clone https://github.com/code4clouds/dockerfiles-windows.git
- Change the directory and explorer the Dockerfile. Notice the line #3 in the Docker repo. I am uses a private registry for my build (in production environment you want to control your docker images for security and auditing reasons), but you can easily change the line to:FROM microsoft/dotnet-framework-build:4.7.1-windowsservercore-1709You will need to add, commit and push your changes.
git add  aspnet-web-builder/Dockerfile
git commit -m ‘update Docker file’
git push
- Let’s now create a virtual machine (VM) that can compile the version of Windows that required by the container (as of this post only Windows 1709 can build/run 1709 Windows images) using this link to Azure: https://ms.portal.azure.com/#create/Microsoft.WindowsServerversion1709withContainers-ARM
- Once created you need to connect to you new VM using the Remote Desktop Protocol (RDP) client to install the VSTS Agent. Follow the instruction here to install it: https://docs.microsoft.com/en-us/vsts/build-release/actions/agents/v2-windows?view=vsts
- Once the VSTS agent is installed make sure the agent is enabled and belongs to a pool (in my case I called it: Azure Windows Agent Pool).

- Let’s create the CI pipeline. Go to your VSTS project, click the “Build and Release” section then click the “+ New” button.
- You will need to select a source for your code (in my case is the GitHub repo)

- Select “Phase 1” and pick your Windows VM VSTS Agent installed previously.

- Let build the steps for the Windows Container Builder CI. The steps can be added my clicking the “+” icon on Phase 1. All the steps we are going to use for our CI can be found by searching for “docker” in the Add task window.

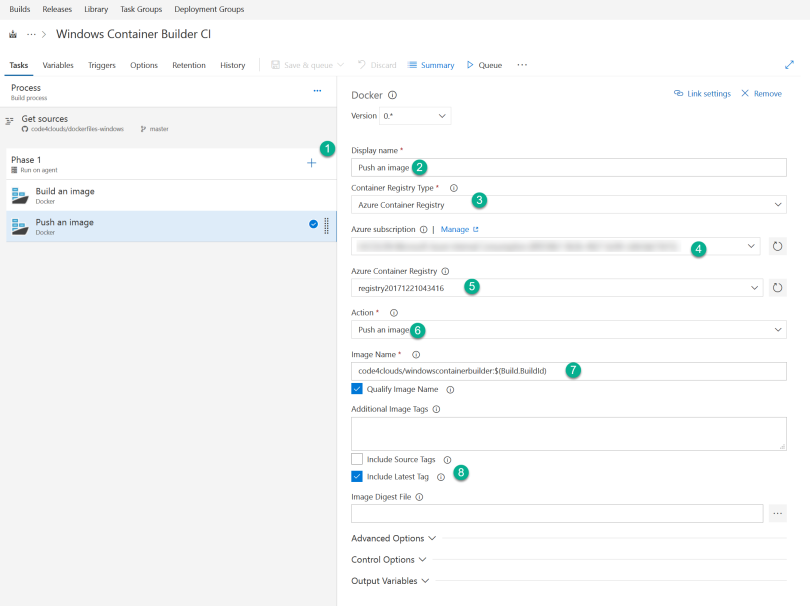
- The next step is to create a Docker build to build the image.Notice in step 7 the container name is changed to code4clouds/windowscontainerbuilder:$(Build.BuildId). The reason for the change is that by default VSTS will use your git repo name to name your containers. My repo has two Dockerfiles which will make the image names overlapped, so to avoid it I named them myself.

- The last step is to push our built image into the docker repo.

- Click “Save and queue” on the top menu to trigger the CI pipeline. You will see the build status and logs in the “Builds” menu.
- We will need to repeat the same CI definition steps, but this time we will use this docker file to build the image “whoami-aspnet/Dockerfile” and will name container: “code4clouds/windowsaspnetapp:$(Build.BuildId)” on both steps. Sample settings below:

An environment for each occasion
Let’s create a set of environments so our development, testers and finally stage/production where all our code will end and reside.
- Let’s select “Build and Release”, select “Release” and click “+ New Definition”.

- On the Tasks menu click “Empty Project”

- Create your first environment and name it QA (Quality Assurance), then repeat the process and create a few mores for Development, Stating and Production (as many as you need).

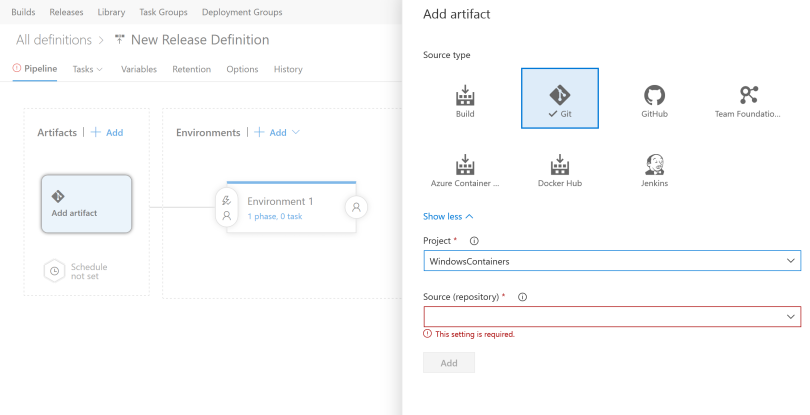
- Let’s add a few artifacts. These are going to be used on the environments.
- Select the Azure repository used to store your ASP.NET image. These is the container image we are going to deploy to our environments.

- Select the Azure repository where your code resides as we will need the Kubernetes deployment files store there.

- Let automate one of the environments. Click the first environment phase.

- Let’s add the tasks and phase to the QA environment. Use the kubectl commands to upload your images to the AKS

- Repeat the previous step and configure your other environment. Once you are done you should have something like the picture below (plus or minus your customization)

- Now lets trigger a build by clicking the Release option on the top menu.

That’s it… now your build will start moving in the pipeline from the left to the right.

If you want enable your build environments with approval, click the circle with the human torso icon. Approvals (and some triggers) can enforced before and/or after an environment is executed.
That’s it! I hope you enjoy building your pipelines as I did. I will welcome all constructive feedback that’s the only way to better at it. Cheers…
